- Overview
- Document Title & Author
- Unique Title Slides
- Reading Order
- Captions
- Checking PowerPoint Accessibility
- Additional Resources
Overview
The following serves as an overview of the main considerations and actions to take to improve the accessibility of your PowerPoint presentations:
- Add a document title to the file.
- Fonts should be accessible (sans serif).
- Ensure alt text is used for images.
- Hyperlinks need to be descriptive.
- True tables need to be accessible.
- Ensure sufficient color contrast.
- Give every slide a unique title (H2).
- Ensure the reading order is accurate.
- Avoid animations & automatic slide transitions.
- Captions for live presentations.
- Captions for embedded video/audio.
- Use accessibility checkers.
Document Title & Author
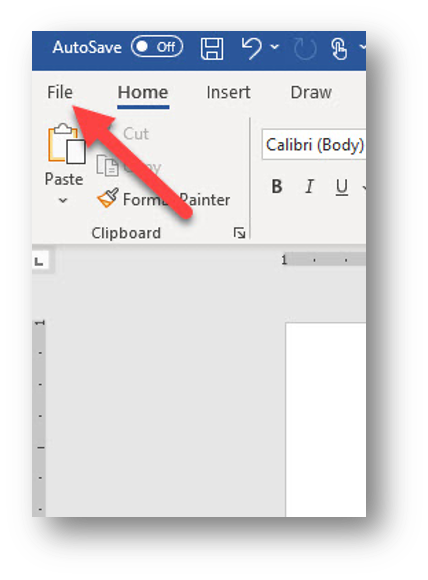
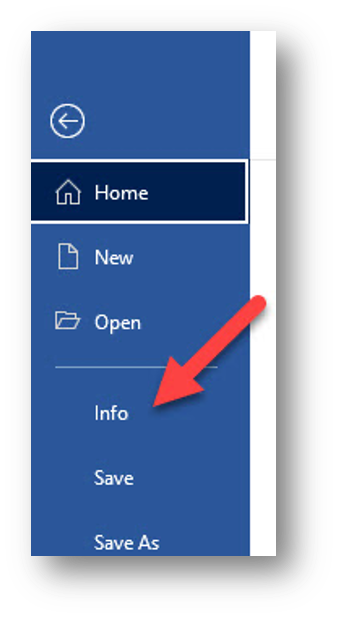
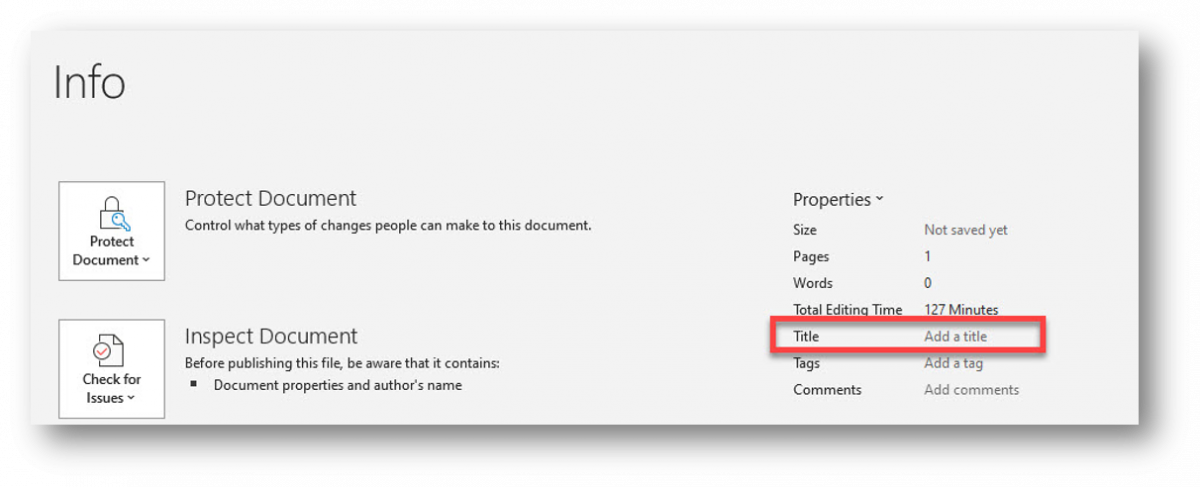
If a file doesn’t have a title, its filename will be used instead. Filenames often include acronyms or abbreviations, which can be confusing when read by a screen reader. To ensure accessibility, every file—such as Word documents, PowerPoint presentations, Excel spreadsheets, and PDFs—must have a proper title. Click File > Info and include a title.
Unique Title Slides
When creating accessible PowerPoint slides, it’s important to ensure every slide has a unique title. Screen readers use slide titles to help users navigate quickly through a presentation. The first slide title is treated as a Heading 1, and all remaining slide titles are treated as Heading 2s by screen readers.
If a slide doesn’t need a visible title—for example, a slide with only an image or a chart—you should still include a title for accessibility purposes. In this case, use the Hidden Title feature. This keeps the title visually out of the way but ensures screen readers can still identify and announce it, maintaining proper navigation and accessibility.
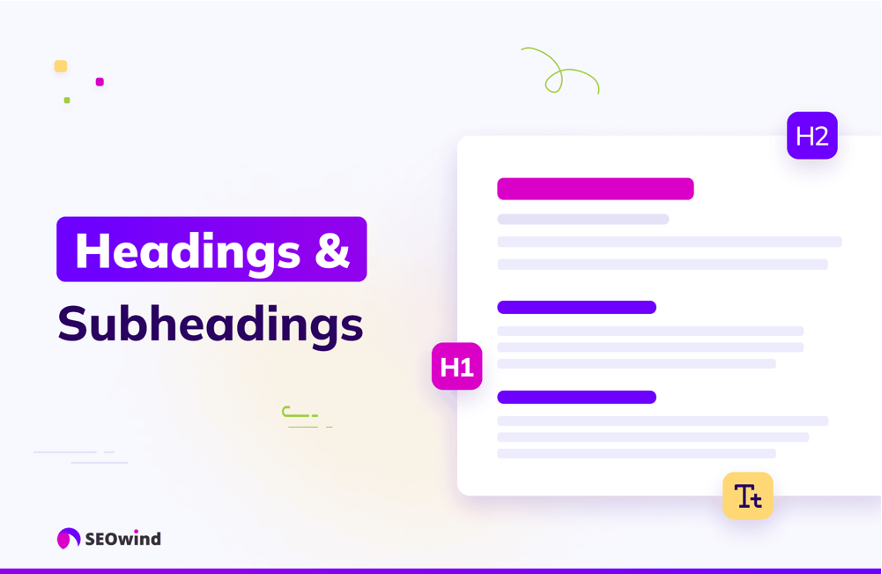
- Slide titles are presented as headings by screen readers.
- If a title is not present or necessary, utilize Hidden Title.
- Visually out of the way while maintaining accessibility.
Reading Order
When working on reading order in PowerPoint, start by grouping related objects into logical units—especially for complex diagrams or illustrations. This is important because screen readers can read grouped objects as a single unit instead of announcing every individual element, which makes navigation much easier for users.
Next, remember that reading order is determined by the sequence in which objects are added to the slide. If you insert items in a random order, the screen reader will follow that same sequence, which can confuse users. Always check and correct the order if necessary.
To do this, use the Reading Order Pane or the Selection Pane. These tools allow you to review and adjust the order in which objects will be read by assistive technologies. Ensuring a logical reading order is critical for accessibility and helps users understand the content in the intended flow.
Reading Order Must-Haves:
- Group objects into logical units for complex diagrams or illustrations.
- Screen readers can read grouped units rather than each individual objects.
- Use the Reading Order Pane or Selection Pane to check the order of objects.
Setting up Reading Order Pane
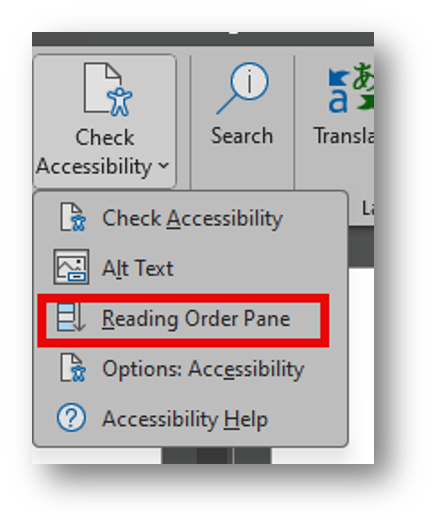
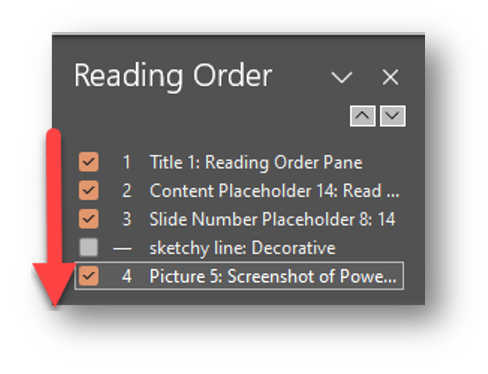
The Reading Order Pane is a key tool for checking and fixing accessibility in PowerPoint. To access it, go to Review > Check Accessibility > Reading Order Pane. This pane shows the order in which screen readers will read the content on your slide, starting from the top and moving down.
When reviewing the reading order, make sure it follows a logical sequence that matches how you want the content to be understood. If you see decorative elements—such as shapes or images that don’t convey meaning—mark them as decorative by unchecking the decorative option. This prevents screen readers from announcing unnecessary items.
Setup Steps:
- Review > Check Accessibility > Reading Order Pane
- Reads top down.
- Add alt text or uncheck decorative elements.
- Learn more about Reading Order Pane on Microsoft’s website.
Setting up Selection Pane
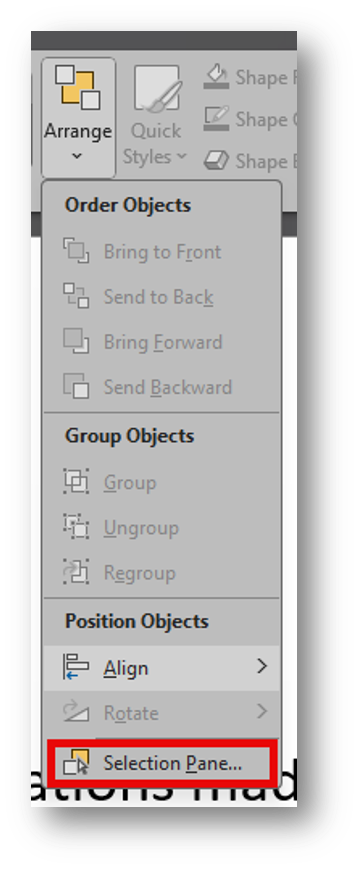
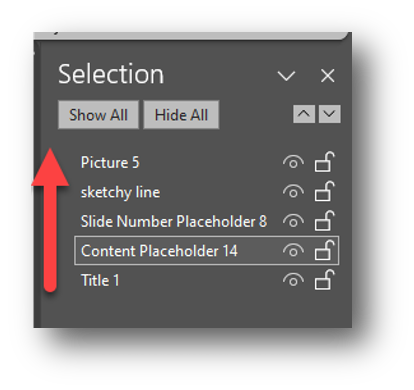
Although the Reading Order Pane is the preferred method, the Selection Pane can be used to verify reading order. Keep in mind that it is read bottom up. The Selection Pane is also used to lock or hide objects on a PowerPoint slide.
Captions
When presenting live in PowerPoint, there are two key features to improve accessibility: PowerPoint Live and Live Captions.
First, PowerPoint Live integrates presentation capabilities with the collaboration features of Microsoft Teams. It allows users to choose whether to turn captions on or off during the presentation. To use this feature in a Teams meeting, select Share, then go to the PowerPoint Live section, and choose your file. This makes it easier for participants to follow along and interact with the content.
Second, Live Captions ensure that everyone sees captions during the presentation. End users cannot turn off the captions. To enable this, use the desktop version of PowerPoint and click Slide Show > and turn on Always Use Subtitles. This setting ensures captions appear automatically during your presentation.
PowerPoint Live
- Users can choose to turn on/off.
- Combines presentation capabilities with meeting/collaboration features of Teams.
- In a Teams meeting: select Share > PowerPoint Live section > Your file.
Live Captions
- Everyone sees the captions.
- Use desktop version of PowerPoint.
- Slide Show > Always Use Subtitles
Embedded Video Captions
Embedded Video Captions Overview:
- Must use VTT or SRT captions.
- Kaltura creates SRT captions
- Edit video > Captions > Download icon
- Use Happy Scribe to convert captions.
- Click video, Playback > Insert captions.
All embedded videos must include captions—even if the video has no sound. For silent videos, add a caption at the beginning stating “No audio” or something similar. Without this, a deaf viewer would not know whether the video is silent or if captions were simply omitted.
PowerPoint uses VTT or SRT captions. If you use Kaltura, you can create, edit and save video captions and export them as an SRT file. Then it can be uploaded to the video in PowerPoint by clicking on the video, playback, insert captions.

Checking PowerPoint Accessibility
Use the Accessibility Checker in Microsoft Office applications, located under the Review tab by selecting Check Accessibility. In HuskyCT, Blackboard Ally automatically checks Word, PowerPoint, and PDF files for accessibility issues. If a file is saved as a PDF, use the PDF Checker 2024 application for Windows to verify its accessibility.
- Microsoft Office
- Review > Check Accessibility
- Turn on Navigation Pane.
- Review > Check Accessibility
- HuskyCT/Blackboard Ally
- For courses and websites.
- PDF/UA PDF Checker 2024
- More technical but provides insight into issues needing remediation.
You can use the following checklist to make sure that you’re meeting the accessibility requirements for PowerPoint presentations:
Accessible PowerPoint Checklist
- Document title is present.
- Alt text for images has been validated.
- Hyperlinks are descriptive and true tables are accessible.
- There is sufficient color contrast and accurate reading order.
- Every slide has a unique title (H2).
- Animations and automatic slide transitions have reduced motion.
- Captions for live presentations or embedded video/audio
- Accessibility checkers were used.