- Introduction
- Captions & Subtitles
- Audio Descriptions (AD)
- Transcripts
- Auto-Play
- Multimedia
- Audio
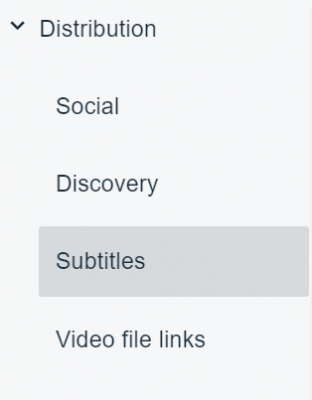
- External Resources
1. Introduction
Accessibility in video and audio formats can be challenging to understand. There is plenty of things that go into ensuring content is as widely accessible as possible. Who is your audience? How do should your content be consumed? What can you do to make it more inclusive?
To answer these questions, you will need to learn how to incorporate captions, subtitles, audio descriptions, and transcripts into the appropriate media format. Another aspect of creating accessible content is considering auto-play when including multimedia into a website or presentation based on your audience. It’s important to keep accessibility in mind despite the incredible effort because you want people to engage with your content regardless of disability and background. Ultimately, an inclusive way to consume your content means more publicity for you.
Watch this video on creating accessible videos and audios:
2. Captions & Subtitles
Captions are text versions of the audio content, timed to be synchronized with the video. They are essential for ensuring your video is as accessible as possible to individuals who are deaf or hard of hearing. There are two different types of captioning: Closed Captions (CC) and Open Captions (OC). Both include dialogue and meaningful audio.
Subtitles are similar to captions but assumes the viewer can hear. It is often used for translating or transcribing the spoken language. It shares many of the same properties as closed captions with its flexibility.
- Added to a video and can be toggled on or off, offering greater flexibility for viewers.
- Improves video search engine optimization (SEO) with minimal file size.
- It’s best for streaming, platforms, and general accessibility where user choice is preferred.
- Permanently embedded in a video and cannot be turned off.
- Guarantees access for everyone and is good for poor audio environments.
- It’s best for public movie screenings or social media content.
- Primarily translates dialogue into different languages.
- Can be toggled (CC) or burned into a video (OC).
- Serves as a tool for clarity, focus, and creativity.
If you need a video captioned as an accommodation for a student, the Center for Student with Disabilities can assist you with captioning your media. If this is an accommodation for faculty/staff, please contact Human Resources.
Adding Captions for Multimedia Platforms
Kaltura provides automated captions through Automated Speech Recognition (ASR) Machine Transcription. This provides:
- Immediate access to machine-based captions (70-85% accuracy) and a “Do It Yourself” Captions Editor for increased fidelity.
- Machine-based Learning with improved accuracy over time and ability to customize glossary.
We recommend that you upload your video to Kaltura and then share it in your course using a link to the Kaltura recording. Refer to UConn’s Knowledge Base on Kaltura Captions to learn how to add and edit captions in the platform.
YouTube can use speech recognition technology to automatically create captions for your videos. Automatic captions may not be ready at the time that you upload a video. Processing time depends on the complexity of the video’s audio.
You can also add captions by uploading a caption file to your video. These types of files contain both the text and time codes for when each line of text should be displayed.
Finally, you can transcribe your video and YouTube will automatically line up your text with the speech in the video. You will need to set the timing to sync with your video.
To ensure that your YouTube videos are as accessible as possible, use the following best practices.
Manually edit auto-generated captions. YouTube automatically generates captions based on its best guess at interpreting the audio. Using auto-generated captions saves time, and manually editing the captions ensures that users with disabilities have access to all the video’s information. Follow the steps below to add captions.
Edit the embed code. A few minor adjustments, like adding a title to your video, make your video display as accessibly as possible on your page. Follow the steps below to edit the embed code.
Add auto-generated captions on YouTube videos with these steps.
- Upload your video to YouTube.
- Click on the link of the video to which you would like to add captions.
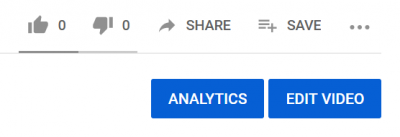
- When the video page appears, click on the Edit Video button.
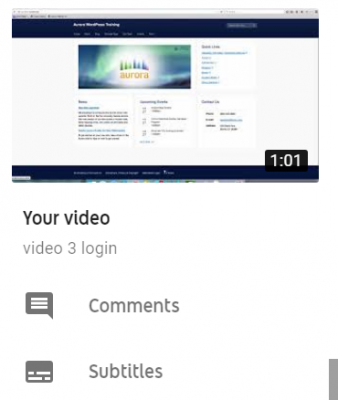
- In the Video side panel, choose “Subtitles”. You will need to scroll down through the list to see it.
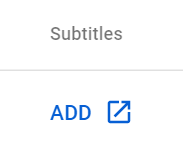
- Click Add.
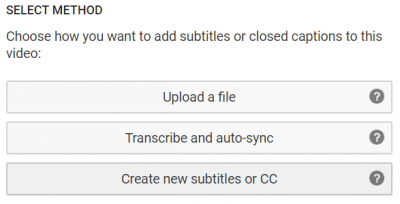
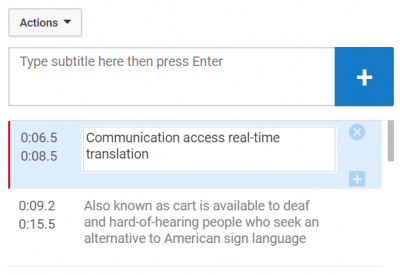
- If you are automatically generating captions, choose Create new subtitles or CC. If you are uploading a .srt file or other caption file, choose Upload a file.
- Edit your captions. Remember, auto-generated captions are only 70-85% accurate and the industry standard calls for 99% accuracy or higher. You will need to edit punctuation, spelling, and speaker changes.
- Save your changes.
Embed YouTube videos on a web page by following these instructions.
Non-UConn Websites
- Outside your desired video, click on the Share button, then select “Embed”.
- The video will automatically start at 00:00. Check “Start at” and enter the desired start time for a different beginning.
- Ensure “Show player controls” under Embed Options is checked for accessibility.
- Click the Copy button and paste the code snippet onto your web page using an HTML code element or block.
UConn Aurora WordPress Websites:
- Log into your site. Select the page you want to edit and go into edit mode.
- ‘Visual’ is the default editor mode; change to ‘Code’ mode.
- Paste the embed code into the text editor.
- Embed code will look like this:
<iframe width="560" height="315" src="https://www.youtube.com/embed/k15YmebYBaw" frameborder="0" allow="accelerometer; autoplay; clipboard-write; encrypted-media; gyroscope; picture-in-picture" allowfullscreen></iframe>.
- Embed code will look like this:
- Delete
allow="autoplay; encrypted-media"from the embed code - Add a title attribute to the embed code using
allow="autoplay; encrypted-media". - If you would like to disable showing suggested videos at the end of your YouTube video, add
?rel=0to the end of your source (?rel=0) code. - Embed code will now look like this:
<iframe width="560" height="315" src="https://www.youtube.com/embed/k15YmebYBaw?rel=0" frameborder="0" allow="accelerometer; clipboard-write; gyroscope; picture-in-picture" allowfullscreen></iframe>.
To ensure that your Vimeo videos are as accessible as possible, you will need to add captions. Vimeo does not have a captions generator or editor built into its platform. This means that you will need to generate captions manually or automatically generate captions and download them from another platform. For more information, visit Vimeo’s guide on adding captions or subtitles to a video.
YouTube can use speech recognition technology to automatically create captions for your videos. However, automatic captions may not be ready at the time that you upload a video and processing time depends on the complexity of the video’s audio.
The following instructions will guide you through automatically generating captions in YouTube, downloading the captions, and uploading them to Vimeo.
Follow the steps outlined to add auto-generated captions from YouTube.
- Upload your video to YouTube.
- Click on the link of the video to which you would like to add captions.
- When the video page appears, click on the Edit Video button.
- In the Video side panel, choose “Subtitles“. You will need to scroll down through the list to see it.
- Click Add.
- If you are automatically generating captions, choose Create new subtitles or CC.
- Edit your captions. Remember, auto-generated captions are only 70-85% accurate, and the industry standard calls for 99% accuracy or higher. You will need to edit punctuation, spelling, and speaker changes.
- Save your changes.
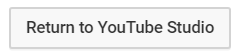
- Return to YouTube Studio.
- Click Videos and select the newly captioned video.
- In the Video side panel, choose “Subtitles”. You will need to scroll down through the list to see it.
- Under the “Subtitles” heading, next to “Published by Creator”, click the three buttons to view more options.
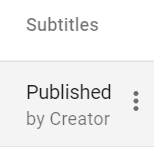
- Download captions.
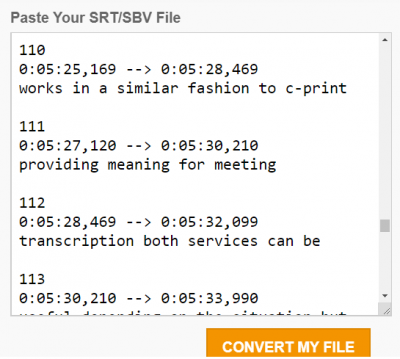
- Change the caption file’s format to WEBVTT and change the output type to it.

- Paste the text from the YouTube SBV file into the text editor and click the Convert My File button.
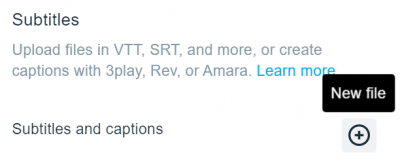
- After uploading your video to Vimeo, select Edit Settings.

- In the Settings panel, select “Distribution” and then “Subtitles“.
- On the Subtitles screen, select the + button to upload your WEBVTT file.
- Set the language, and under Type, select “Captions”.
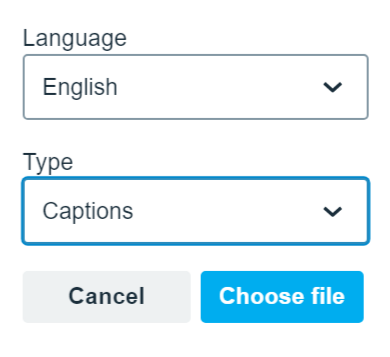
- Select the Choose file button and find the WEBVTT file in your Downloads folder.
- Toggle Captions on.
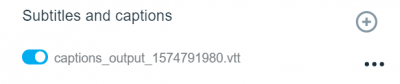
- Click Save.
Microsoft Stream provides automated captions through Automated Speech Recognition (ASR) Machine Transcription. This provides:
- Immediate access to machine-based captions (70-85% accuracy) and a “Do It Yourself” Captions Editor for increased fidelity
- Machine-based Learning with improved accuracy over time and ability to customize glossary
To add captions to your Microsoft Stream video, use the following steps:
Add captions to Microsoft Stream Video.
- Upload your video to Microsoft Stream by clicking the Create dropdown, or navigate to existing content under “My Content”.
- Select the Edit icon next to the video which you would like to caption.

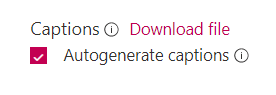
- In the Options panel, check the box next to Autogenerate captions.
- If you already have a caption file for your video, leave the Autogenerate captions box unchecked and instead select Upload a subtitle file.
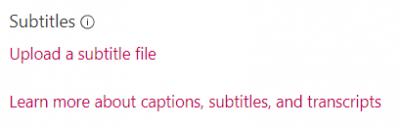
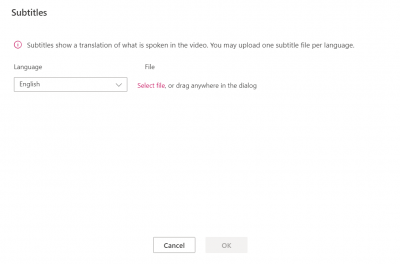
- Select a language for your subtitle file and upload the file.
- If you already have a caption file for your video, leave the Autogenerate captions box unchecked and instead select Upload a subtitle file.
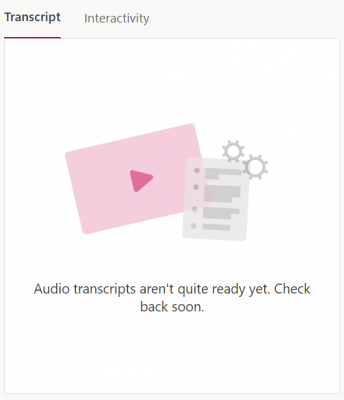
- When you return to view your video (under “My Content”), you will see a pane that says your audio transcript is not ready yet; transcripts typically take a few minutes to appear.
- Once your transcript is ready, you will be able to edit the captions in the pane by selecting the Edit icon next to the Search transcript bar.
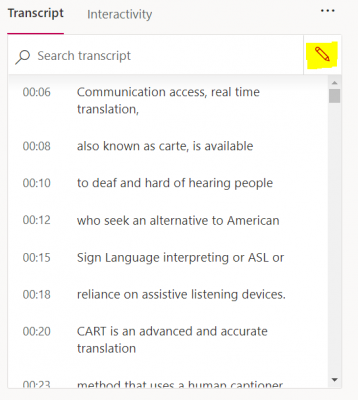
- Edit your captions for accuracy.
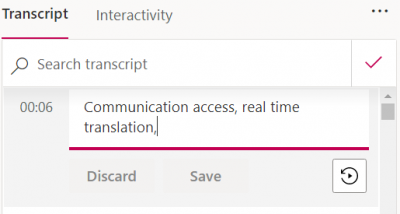
- Click Save.
UConn has contracted with 3Play Media for professional captioning services. Refer to UConn’s Knowledge Base article on 3Play Media Captions to learn how to submit captioning material to the service provider. Technical questions regarding captioning may be directed to Academic IT at ait@uconn.edu.
3. Audio Descriptions (AD)
Audio descriptions are typically pre-recorded narration of visual content in videos that often sync with the picture. They are essential for blind viewers or people with low vision. A describer ensures all significant visual information is conveyed and provide necessary context to make the experience more accessible.
“During existing pauses in dialogue, audio description provides information about actions, characters, scene changes, and on-screen text that are important and are not described or spoken in the main sound track” (W3C on WCAG 2.1 Success Criterion 1.2.5).
Example from W3C
- Describer (AD): A title, “Teaching Evolution Case Studies. Bonnie Chen.” A teacher shows photographs of birds with long, thin beaks.
- Bonnie Chen (Video): “These photos were all taken at the Everglades.”
- Describer (AD): The teacher hands each student two flat, thin wooden sticks.
- Bonnie Chen (Video): “Today you will pretend to be a species of wading bird that has a beak like this.”
- Describer (AD): The teacher holds two of the sticks to her mouth making the shape of a beak.
Transcript of audio based on the first few minutes of “Teaching Evolution Case Studies, Bonnie Chen” (copyright WGBH and Clear Blue Sky Productions, Inc.).
4. Transcripts
Transcripts are useful for ensuring universal accessibility that serve as the text version for speech and non-speech elements. Unlike basic transcripts that contain plain text of speech, descriptive transcripts provide Deaf, hard-of-hearing, and auditory process condition individuals with visual information needed to understand the content. If you include a descriptive transcript, then there is no need for a basic version.
Interactive transcripts is another type that highlights text phrases as they are spoken. A user who selects text within the transcript can quickly go to the point when it is heard. This is a feature of the media player.
Best Practices
- For video-only content, include important visual information.
- For audio-only content, ensure accuracy to speech.
- For video and audio, opt for a descriptive transcript.
- Exclude filler words, such as “ah” or “um”, unless they convey meaning.
- Break up long blocks of words by using lists, images, and headings.
- Ensure users can quickly locate the transcript.
Refer to W3C’s guide on transcripts based on WCAG 2.1 standards.
5. Auto-Play
Have you ever visited a website that start playing videos as soon as you go to the page? In some cases, depending on how the webpage was designed, browser and application settings can be changed to disable or limit auto-play.
Importance
Automatically updating or playing content may pose problems for users with disabilities such as motion sensitivities, cognitive disabilities, and may also interferes with screen readers. Content that can create a barrier includes materials that automatically plays audio, moves, blinks, scrolls, or updates. To make this content more accessible a key is to provide a method to pause, stop, hide, or control automatic content and provide notification of each automatic change of content.
Solutions for Situations
- Include controls to stop the content if:
- Audio content auto-plays for more than 3 seconds. This can interfere with a screen reader user’s ability to hear their device. An example of auto-playing audio content is a YouTube video that plays when a page is opened.
- Content moves for more than 5 seconds. This can be distracting for some users and inhibit their ability to interact with other sections of page content. An example of auto-updating moving content is a counter ticking off the time until an event that updates every second.
- Use a change notification. In this method, the user receives notification of that change and can correlate the change with equivalent programmatic or textual information. An example of this is a counter that audibly notifies the user every time a donation is made.
Limitations
Disabling auto-play is not always built into a platform, such as with some social media platforms, and not every browser or platform is created equally for disabling auto-playing multimedia. Explore different ways to disable or limit auto-play in your digital environment.
Turning Off Auto-Play
Microsoft’s Edge browser allows you to limit video auto-play:
- In the upper right corner select the three dots and select Settings.
- In the left-hand column, select Site Permissions, and then select Media auto-play.
You may allow audio and video to play automatically or to limit it.
Firefox also lets you limit auto-play.
- In the upper right corner of the browser select the three dots and select Preferences.
- In the left-hand column, select Privacy & Security.
- Under the permissions heading Permissions and look for Auto-play and select the button marked Settings.
- Under the dropdown menu it will allow you to allow audio and video, block audio, or block audio and video.
You may also specify which sites to block or allow.
Safari allows you to disable auto-play and make exceptions to specific sites.
- While in the app, on the top menu select Preferences.
- Select Websites on the top menu.
- Select Auto-play on the side menu.
- On the bottom right of the window select the drop-down and select Never Auto-play.
You may also specify which sites to block or allow.
Google Chrome does not allow you to turn off video auto-play. There was previously an experimental command-line flag that allowed you to turn them off by typing chrome://flags/ into Chrome’s address field.
If you’re using Facebook on your browser, you can turn off auto-play videos this way:
- On the top right of the page select the drop-down menu
- Select Settings & Privacy and then Settings.
- In the left hand menu, toggle off auto-playing videos in the Videos listing.
Facebook has similar options available for its iOS and Android apps:
iOS App
- On the bottom of the screen select the menu button.
- Select Settings & Privacy and then Settings.
- Scroll down and select Media and Contacts, then select Videos and Photos.
- Disable Auto-play to turn off this feature.
Android App
- On the top of the screen select the menu button.
- Select Settings & Privacy and then Settings.
- Scroll down and select Media and Contacts .
- Select Auto-play and set to Never Auto-play Videos.
- In the left hand menu select More and then Settings and privacy.
- Select Data usage.
- Select Auto-play setting. and switch off auto-playing of videos.
iOS & Android Apps
- Select the profile picture.
- Select Settings and privacy.
- Navigate to Data usage, select Video auto-play, and set to Never.
The Instagram app doesn’t allow for auto-play videos to be turned off. Videos don’t auto-play if you use Instagram on your browser.
6. Multimedia
Multimedia is a combination of audio and video. To be accessible, synchronized captions are required and audio descriptions are recommended. Media includes images, videos, and audio. In order to be accessible, practice the following principles:
- Images must have alternative text. This means an equivalent description of the image. If an image contains text, the alt text must include the same text in the image.
- Videos must have a media alternative. There must either be an equivalent full description of the visuals in the video or an audio description needs to be provided.
- Audio must have an alternative format. Formats such as captions or a transcript that verbalizes all auditory information and important sounds are acceptable.
- Disable auto-playing on videos. Ensure content remains accessible for people who prefer reduced motion.
- Revise any auto-generated captions. Keep in mind these are never 100% accurate, so you may need to edit as needed.
If there is a purpose for media with flashing or blinking content is needed, provide a warning to users.
7. Audio
Some media is audio-only, meaning it has no visual component. Because caption timing is not as important in audio-only media, a transcript is a sufficient alternative format.
Transcripts are typically verbatim, written records of pre-recorded audio. They include information about speaker changes and ambient noises, if that information is relevant. For example, in a recorded discussion about different dog breeds, barking may be key information.